Chevy Colorado & GMC Canyon banner

How To: DRL Delete (2nd Gen)

71K views 91 replies 48 participants last post by  Offroader8  
#1 · (Edited)
Since the days of pulling a DRL fuse are gone, I had to get a little inventive. Ordered a new headlight switch from GMPartsDirect for $26 to play with. The goal was to be able to manipulate the switch so it could stay in the "off" position rather than always springing back to "auto" so I could leave it "off" and not have to turn it every time I got in the truck.

(Don't judge the dirtiness of my truck. I work in a rock quarry lol)

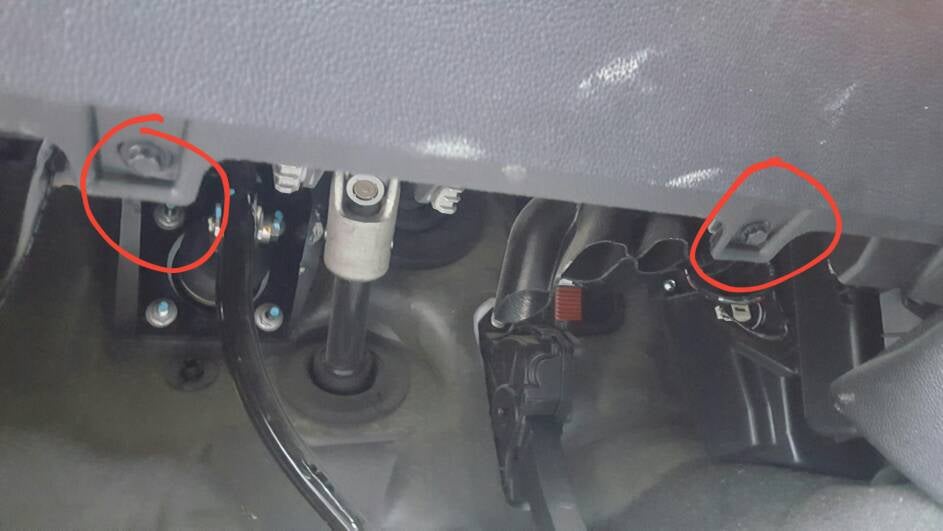
Removing the factory switch is a pain. First you'll need a 7mm socket to take two screws out of the lower dash trim.
Image


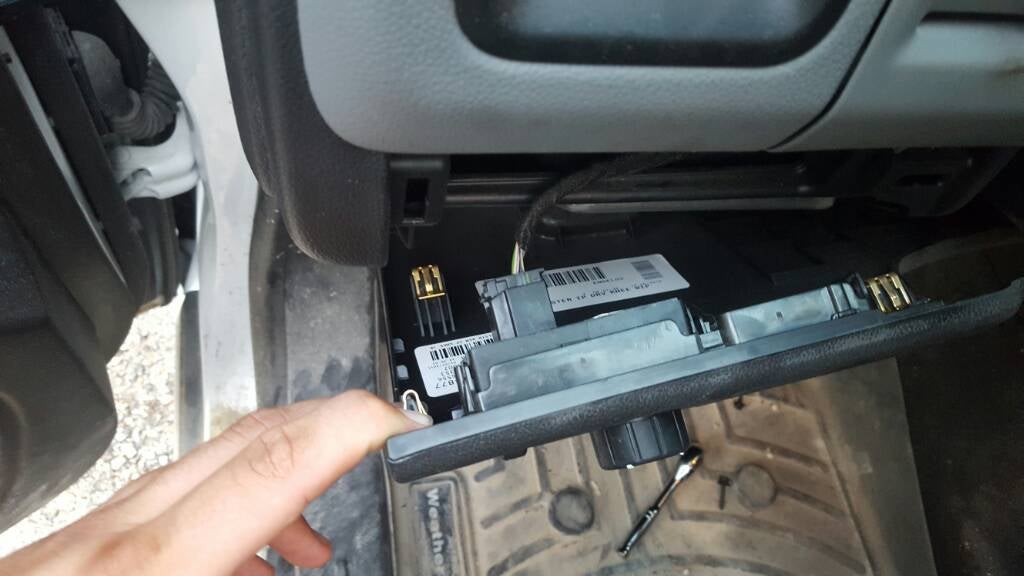
Then pull on the top corner of the trim piece closest to the steering wheel. It's held in by a few trim tabs. You'll only be able to pull it 1/2 way out due to the hood latch release still being attached to the bottom. You'll see a tab on each side holding the switch in place. Pull the tabs outward and disconnect the wiring plug.
Image


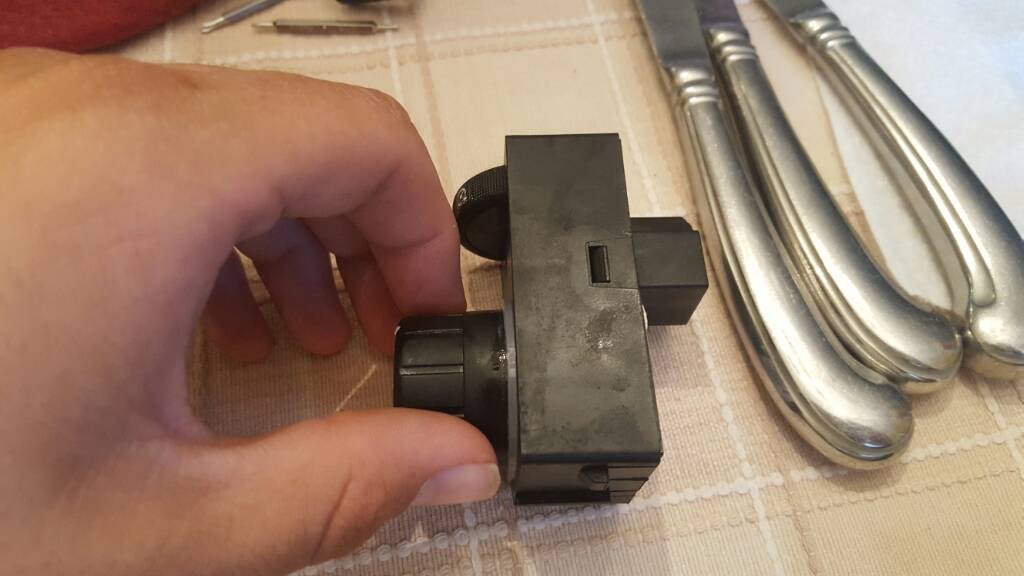
Taking the switch apart is pretty self explanatory. Four tabs hold it together. Use a small flathead to push tabs and pull the housing apart. Had to pry a good bit but nothing broke.
Image


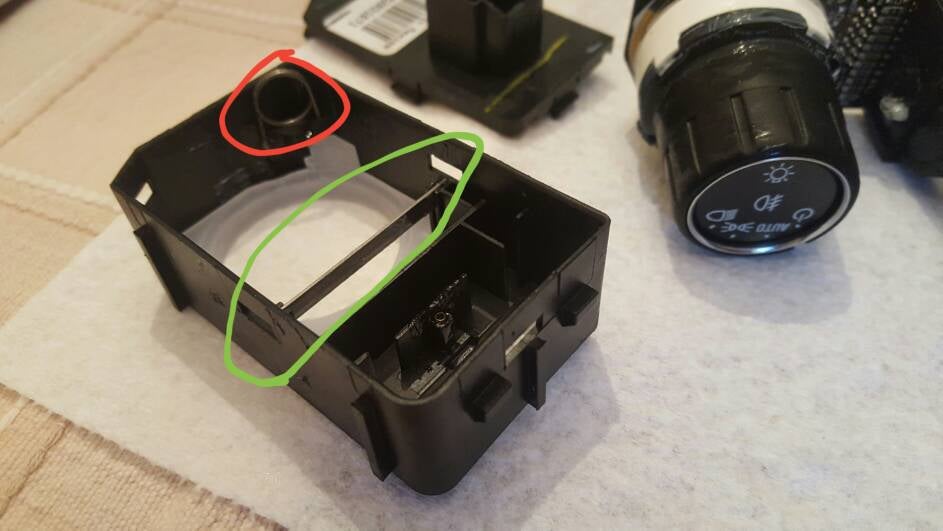
Once apart, you'll see the spring in the upper corner. You'll also see this flat little metal piece. Take note of where the metal piece sits. Very crucial that it goes back in the same way. Spring is circled red. Metal piece is circled green.
Image


Remove spring. It will not be used again. Make sure flat metal piece goes back into its little slots that it came out of. Your fingers will get covered in grease during this. They went a little crazy when applying the electrical grease to everything. Now put it all back together. Make sure the electrical pins for the plug fit back through. It is a hair tricky making the knob go back through the hole. That flat metal piece kinda catches the side of the knob. Just wiggle everything until it all slides back together. Put the back plate on and you're all set.

Once this modification is done, your truck will always get an off signal if the switch is left off. The only downside is your headlights won't turn on when you unlock the truck, if that's how you have your unlock sequence set. That's a perfectly fine trade off for me. Tired of turning the headlight dial off every time I get in my truck.

Thanks for reading and post any helpful comments (except "why would you do this?")

Sent from my SM-G920V
 
#2 ·
Thanks for taking the lead on this and for the helpful replies in the other thread. I'll be doing this as soon as I'm back on my feet after knee surgery....:crying:
 
  • Like
Reactions: bigboi98
#5 ·
You know what was said to the German Commander at the Battle of the Bulge.........>:) Good job and write up though.
 
  • Like
Reactions: Toughsox
#8 ·
Will the headlight still come on at night or do you manually have to turn them on?
 
#10 · (Edited)
Manually. Pretty much just like the newer Fords. You can leave it on auto if you want and everything will work like normal. Or leave it off and just have to turn them on when needed. If I go somewhere at night, I can put it on "auto" and not have to touch it. If I go somewhere during the day I can put it on "off" and not have to touch it until that night.
Forgive the dumb question, but what is the appeal of not running DRLs?
Not a fan of the look of halogen DRLs. LED looks great. But not halogen. Looks dinky to me. This is purely cosmetic.

Sent from my SM-G920V
 
#9 ·
Forgive the dumb question, but what is the appeal of not running DRLs?
 
  • Like
Reactions: Tucson Bill
#14 ·
No problem. Glad it worked out for ya.
Also useful for those who have HID conversions and don't want to put the extra cycles / hours on the ballasts / bulbs.

Nice write up! I had heard about this being done before but it's a creative way to address the issue.
Another very valid point is HID cycling.

And if someone is running a bulb like Sylvania Ultra White which only had a 100hr life. No need in burning them up when you don't need to.

Sent from my SM-G920V
 
#13 ·
Also useful for those who have HID conversions and don't want to put the extra cycles / hours on the ballasts / bulbs.

Nice write up! I had heard about this being done before but it's a creative way to address the issue.
 
  • Like
Reactions: Drag Limited
#16 ·
Freakin sweet. So glad this is so easy. Thank you for being the Guinea pig on this.

One question before I do this. Once done and the switch is staying in the off position. When you turn the truck off with the lights off, then start it the next time; do you get that alert at start up that you normally do when switching from auto to the off position?
 
#20 ·
Just a note, if the truck is started with the switch in the off position, in order to to get the auto function to activate you must turn the dial to the next notch after auto then back to auto. The system thinks you've physically turned the lights off so you must turn an actual light on to activate the auto system. It seems complicated but I suck at explaining things.

So when the truck is started with the switch off, just remember that you have to physically turn the lights on before returning the dial to "auto" if it rains, driving through a tunnel, etc.

Still a trade off I'll take any day over turning the knob every time.

Sent from my SM-G920V
 
#22 ·
0.2% of the time I don't remember if I did or not -therefore I have to carry out that procedure to 'make sure they are off'.
One of the main reasons I wanted to do this project. Riding down the road I'd always forget if I cut them off or not and didn't wanna accidentally flash someone in case I did already cut them off. Really aggravating. Now I'll know because of where the switch sits. Which is how it should've been made in the first place.

Sent from my SM-G920V
 
#25 · (Edited)
Now I'm confused lol

If you were to go to your truck now with the factory switch and start the truck. Leave the switch on "auto" position just like it would be before the modification. Just like normal. Now turn the switch off, letting the switch go back to auto. At this point, this is how it will start every time now. Lights off. Now you'll have to turn the switch to parking light then back to auto to activate the auto system since the truck thinks you turned the system off when you started the truck.

If someone that has done this could chime in. I'm a good talker, just not a good typer when explaining.

Sent from my SM-G920V
 
#26 ·
I hear what your saying, because the BCM thinks that the first switch back to the Auto position from Off is actually "normal" operation for the mechanism it ignores that first request to run the lights on Auto.

So then all the rest of the DIC messages alert as normal?
 
#28 ·
Since the days of pulling a DRL fuse are gone, I had to get a little inventive. Ordered a new headlight switch from GMPartsDirect for $26 to play with. The goal was to be able to manipulate the switch so it could stay in the "off" position rather than always springing back to "auto" so I could leave it "off" and not have to turn it every time I got in the truck.
Thanks for this, I too need to do this mod since I have HID low beams and dont want to run it everytime. Been constantly turning it off everytime I start my truck.

So if I get this right, I really don't need to buy a spare headlight switch right? I just need to remove that spring so it doesn't keep going back and rest on AUTO?
 
#29 ·
Exactly. I just bought the spare because I didn't want to unintentionally break my primary one during experimentation and be screwed.

But the process is super simple. Only chance you have of breaking anything would be opening the housing. Just be forceful, yet careful.

Sent from my SM-G920V
 
#30 ·
I'm having trouble getting the switch assembly to come out. You can see that on the left side I've got the locking tabs released but on the right side of the assembly it's still held in there tight. Shouldn't the selector knob and the whole assembly just slide straight back at this point? What is the secret sauce for getting this thing out?

 
#31 ·
Did this today too and got stuck just as you are.

Fortunately that is about enough to still get the switch backing plate off and pull the spring out. See if you can just get a small screwdriver into the switch back and pull it off like I did you'll see the spring on the inboard top corner and you can just pull it out with needle nose pliers and put everything back :wink2:
 
#33 ·
4WD Model Solved

Got this figured out today. I first tried just getting the left side retaining clip free and then try to release the four tabs holding the switch assembly undone. I broke two of them. Out of frustration I took the whole kick panel down and undid the hood release (very easy) so I could get a better look and discovered that there IS another tab between the switch assembly on the right side and the housing that holds it. The tab is hidden down there and doesn't have a spring clip associated with it. I stuck a small screw driver down in there and deformed the housing wall enough to be able to pull up on the right side of the assembly and THEN released the left side spring clip. Popped right out after that...!

Here is the area the hidden tab is while the assembly is in the housing. It's down in there but the arrow points to the area where you need to pry a little bit.
[/URL

This photo shows the area of the empty housing where the tab on the assembly nests into it...


This shot shows the actual tab on the right side of the assembly after removing it...

[URL=http://s1092.photobucket.com/user/Bumble-Z/media/2016-06-19%2008.27.16.jpg.html]


After removing the spring, I had to clamp the assembly back together and put a couple of drops of Gorilla glue to tack it together where I broke the two tabs. If you get the right side housing tab released when you remove this you shouldn't have the damage that I did...
 
  • Like
Reactions: lqdchkn
#36 ·
Got this figured out today. I first tried just getting the left side retaining clip free and then try to release the four tabs holding the switch assembly undone. I broke two of them. Out of frustration I took the whole kick panel down and undid the hood release (very easy) so I could get a better look and discovered that there IS another tab between the switch assembly on the right side and the housing that holds it. The tab is hidden down there and doesn't have a spring clip associated with it. I stuck a small screw driver down in there and deformed the housing wall enough to be able to pull up on the right side of the assembly and THEN released the left side spring clip. Popped right out after that...!

Here is the area the hidden tab is while the assembly is in the housing. It's down in there but the arrow points to the area where you need to pry a little bit.
[/URL

This photo shows the area of the empty housing where the tab on the assembly nests into it...


This shot shows the actual tab on the right side of the assembly after removing it...

[URL=http://s1092.photobucket.com/user/Bumble-Z/media/2016-06-19%2008.27.16.jpg.html]


After removing the spring, I had to clamp the assembly back together and put a couple of drops of Gorilla glue to tack it together where I broke the two tabs. If you get the right side housing tab released when you remove this you shouldn't have the damage that I did...
Sorry to hear about the troubles you had. If you want, you can have my spare switch I ordered. Just cover shipping. It's already modified and has the factory fog light switch.

Sent from my SM-G920V
 
#34 ·
Like the sticker says, "Assembled in Mexico". I need a new label that says "Damaged in the USA". If I'd had a Mexican handy, this might have gone smoother.....:)
 
#35 ·
How do you say "let go" in Spanish?
 
  • Like
Reactions: bradreeves7043
#40 ·
Off is off man. When you turn the knob to off no lights are on. The only way the taillights would be on (stock or modified switch) is if you turned the knob to park or headlights.

All functions operate the same, except now you can always stay in the off position.
 
#58 ·
I've been lurking here for a while doing research prior to buying my Colorado and this thread is one that I bookmarked in anticipation of performing this defeat as soon as it was in my garage. Well, Friday I got the truck and today I did the modification. It was as described and very simple to do. Thank you for breaking new ground and taking the time to write up this tutorial!

The goal here may have been to defeat the DRL's, but mine was to override the auto headlight "feature" which this also accomplished. I still might get the DRL relocation harness so that I can choose to put the switch in Auto and have the DRL's function with the amber lights, but at least now I won't annoy people with the auto headlights when just parked.

Thanks again!
 
#44 · (Edited)
Not really no. But it stays in the off position fine.

I went threw this whole process only to find out our Canadian trucks have DRL on the low beams that come on as soon as I take the truck outta park. ?
In Canada aren't DRL required by law? In the US they aren't :wink2:

P.S. FART >:)